> For the complete documentation index, see [llms.txt](https://guide.cronuszen.com/llms.txt). Markdown versions of documentation pages are available by appending `.md` to page URLs; this page is available as [Markdown](https://guide.cronuszen.com/quick-start-and-downloads/step-3-controller-compatibility/wireless.md).
# Wireless
Set up your console and controller over Bluetooth® or a wireless adapter.
{% hint style="info" %}
Not sure whether your controller works wirelessly? See [Controller](/supported-devices/controller.md) compatibility first.
{% endhint %}
Every setup on this page comes in two forms:
| Variant | When to use it |
| ------------- | --------------------------------------------------------------------------------------------------------------------------------------------- |
| **Matched** | Controller and console are from the same platform. |
| **Crossover** | Controller and console are from different platforms. Needs an **authentication (AUTH) controller** matching the console, connected to **A1**. |
***
### :xbox: Xbox® — Wireless Adapter
Any Xbox® controller can be used wirelessly on an Xbox Series X|S® or Xbox® One console, or on another supported console such as PS5®. Requires the [Xbox® Wireless Adapter](https://cronus.shop/products/xbox-one-wireless-adapter).
{% stepper %}
{% step %}
#### Connect the adapter
Plug the **Xbox® Wireless Adapter** into **A3**.
{% endstep %}
{% step %}
#### Connect the controller by cable
Plug the Xbox® controller into **A2** using a USB cable.
{% endstep %}
{% step %}
#### Remove the cable
Wait a few seconds, then unplug the USB cable from **A2**.
The adapter LED starts blinking. When it turns solid white, the controller is paired with the Zen.
{% endstep %}
{% step %}
#### For crossover only: add the AUTH controller
Connect a controller that matches your console to **A1**.
For example, on a PS5® with an Xbox Elite Series 2 controller: a DualSense™ goes into **A1**, and the Xbox® controller pairs to the adapter in **A3**.
{% endstep %}
{% endstepper %}
***
### :playstation: PlayStation® — Bluetooth®
{% stepper %}
{% step %}
#### Put the Zen into pairing mode
Press the **P2 Bluetooth® pairing button** on the Zen. The RGB LEDs flash blue.
{% endstep %}
{% step %}
#### Put the controller into pairing mode
Hold the button combination for your controller until the light bar flashes.
| Controller | Hold |
| --------------- | ------------------- |
| **DualShock®4** | **SHARE** + **PS** |
| **DualSense™** | **Create** + **PS** |
When pairing succeeds, both the controller light bar and the Zen RGB LEDs turn solid blue.
{% endstep %}
{% step %}
#### For crossover only: add the AUTH controller
Connect a controller that matches your console to **A1**.
{% endstep %}
{% endstepper %}
***
### :gamepad-modern: Switch Pro Controller — Bluetooth®
Any Nintendo Switch® Pro Controller can be used wirelessly on a Nintendo Switch® console, or on another supported console such as PS5®.
{% stepper %}
{% step %}
#### Put the Zen into pairing mode
Press the **P2 Bluetooth® pairing button** on the Zen. The RGB LEDs flash blue.
{% endstep %}
{% step %}
#### Put the controller into pairing mode
Press and hold the **SYNC** button on the Pro Controller until the player LEDs flash.
When pairing succeeds, the player LEDs and the Zen RGB LEDs stop flashing and stay solid.
{% endstep %}
{% step %}
#### For crossover only: add the AUTH controller
Connect a controller that matches your console to **A1**.
{% endstep %}
{% endstepper %}
***
### :gamepad: Switch Joy-Con — Bluetooth®
Left and Right Joy-Con controllers pair individually.
{% stepper %}
{% step %}
#### Set the output protocol
Connect the Cronus Zen™ to a computer using the **PROG USB** port. In **Zen Studio → Device Panel**, set **Emulator Output Protocol** to `Nintendo Switch`.
{% endstep %}
{% step %}
#### Connect the Zen to the console
Use the **CONSOLE/PC USB** port to connect to the Switch® TV dock.
{% hint style="info" %}
Handheld mode without the TV dock requires a USB-C OTG adapter.
{% endhint %}
{% endstep %}
{% step %}
#### Put the Zen into pairing mode
Press the Zen's **P2 Bluetooth® pairing button** until the RGB LEDs flash blue.
{% endstep %}
{% step %}
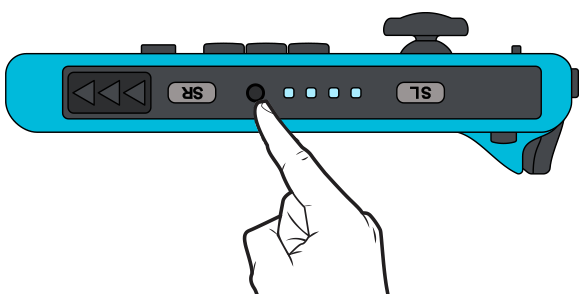
#### Pair the Left Joy-Con
Press and hold the **SYNC** button on the Left Joy-Con until the player LEDs flash. After a few seconds the Zen RGB LEDs turn red and the Joy-Con vibrates.
{% endstep %}
{% step %}
#### Pair the Right Joy-Con
Press and hold the **SYNC** button on the Right Joy-Con. After a few seconds the Joy-Con vibrates.
{% endstep %}
{% endstepper %}
{% hint style="info" %}
A powered USB hub with a 5 V auxiliary power input is recommended. Connect the hub to your PC or Mac, then connect the Zen to the hub.
This helps prevent PS5® disconnections, pairing failures, input lag, loss of vibration, and adaptive trigger issues.
{% endhint %}
---
# Agent Instructions
This documentation is published with GitBook. GitBook is the documentation platform designed so that both humans and AI agents can read, navigate, and reason over technical content effectively. Learn more at gitbook.com.
## Querying This Documentation
If you need additional information that is not directly available in this page, you can query the documentation by asking a question.
Perform an HTTP GET request on the following URL with the `ask` and `goal` query parameters:
```
GET https://guide.cronuszen.com/quick-start-and-downloads/step-3-controller-compatibility/wireless.md?ask=&goal=
```
`ask` is the immediate question: it should be specific, self-contained, and written in natural language.
`goal` is what the user is ultimately trying to achieve, the reason they need the answer. Sharing it helps GitBook give you a better, more relevant answer. A goal is most helpful when it describes the outcome the user wants rather than restating the question. For example, with `ask=how do I create an API token`, a goal like `automate deployments from our CI pipeline` lets GitBook tailor the answer to that use case.
The response will contain a direct answer to the question and relevant excerpts and sources from the documentation.
Use this mechanism when the answer is not explicitly present in the current page, you need clarification or additional context, or you want to retrieve related documentation sections.